


9-24
Cisco Wireless LAN Controller Configuration Guide
OL-8335-02
Chapter 9 Configuring Radio Resource Management
Overriding Dynamic RRM
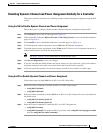
Statically Assigning Channel and Transmit Power Settings to Access Point
Radios
This section provides instructions for statically assigning channel and power settings using the GUI or
CLI.
Note Cisco recommends that you assign different nonoverlapping channels to access points that are within
close proximity to each other. The nonoverlapping channels in the U.S. are 36, 40, 44, 48, 52, 56, 60,
64, 149, 153, 157, and 161 in an 802.11a network and 1, 6, and 11 in an 802.11b/g network.
Note Cisco recommends that you do not assign all access points that are within close proximity to each other
to the maximum power level.
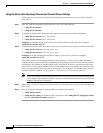
Using the GUI to Statically Assign Channel and Transmit Power Settings
Follow these steps to statically assign channel and/or power settings on a per access point radio basis
using the GUI.
Step 1 Click Wireless to access the All APs page (see Figure 9-2).
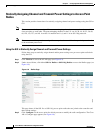
Step 2 Under Access Points, click either 802.11a Radios or 802.11b/g Radios to access the Radios page (see
Figure 9-8).
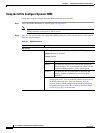
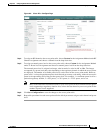
Figure 9-8 Radios Page
This page shows all the 802.11a or 802.11b/g access point radios that are joined to the controller and
their current settings.
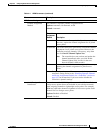
Step 3 Click Configure for the access point for which you want to modify the radio configuration. The Cisco
APs > Configure page appears (see Figure 9-9).