


5-12
Cisco Wireless LAN Controller Configuration Guide
OL-8335-02
Chapter 5 Configuring Security Solutions
Customizing the Web Authentication Login Screen
Changing the Web Message
Use this command to change the Web Authentication Login window message:
config custom-web webmessage message
To reset the Web Authentication Login window message to the Cisco WLAN Solution default (“Cisco
WLAN Solution is pleased to provide the Wireless LAN infrastructure for your network. Please login
and put your air space to work”), use this command:
clear webmessage
Changing the Logo
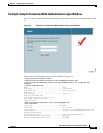
These sections explain how to change the logo on the right side of the Web Authentication Login
window:
• Preparing the TFTP Server, page 5-12
• Copying the Logo or Graphic to the TFTP Server, page 5-12
• Downloading the Logo or Graphic, page 5-13
• Hiding the Logo, page 5-13
Preparing the TFTP Server
Follow these steps to prepare a TFTP server to load the logo:
Step 1 Make sure you have a TFTP server available to load the logo.
• If you are downloading through the Service port, the TFTP server MUST be on the same subnet as
the Service port, because the Service port is not routable.
• If you are downloading through the DS (Distribution System) network port, the TFTP server can be
on the same or a different subnet, because the DS port is routable.
Step 2 On the CLI, enter ping ip-address to ensure that the controller can contact the TFTP server.
Note The TFTP server cannot run on the same computer as WCS. WCS and the TFTP server use the
same communication port.
Copying the Logo or Graphic to the TFTP Server
Follow these steps to copy the logo to the TFTP server:
Step 1 Create a logo in .JPG, .GIF, or .PNG format with a maximum file size of 30 kilobits. For the best fit in
the space available, make the logo around 180 pixels wide and 360 pixels high.
Step 2 Make sure the image filename does not contain spaces.
Step 3 Copy the image file to the default directory on your TFTP server.