


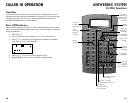


ANSWERING SYSTEM
Remote Operation
61
ANSWERING SYSTEM
Auto-Attendant Operation
60
You can access many features of this answering system when you are away
from your phone. The remote commands are the same whether you are
calling from a remote, non-system touch tone phone or from another
extension in the 964 phone system. Only the method for connecting with
the answering system differs.
NOTE: If you are using this phone as part of a multi-phone system, be
sure Auto-Attendant is turned on as well. If you are using this phone
as a single phone, leave the Auto-Attendant Off and set your phone for
Single Phone Operation (see SET UP SYSTEM FEATURES).
Connect with the Answering System
From a touch tone phone outside the 964 phone system
1 Dial your telephone number.
2 If your 964 is a single phone, skip to Step 3
— OR —
If your 964 system has multiple phones, the Auto-Attendant will
answer. After the outgoing message, enter the extension number
you wish to reach.
3 When the D-TAD outgoing announcement begins to play at the
extension you wish to reach, enter your password (see “Program
Your Password for Remote Operation” in SET UP SYSTEM
FEATURES). The system announces,“Remote operation.”
4 Enter the remote commands (see “Remote Commands”).
5 To exit remote operation, hang up. The system will automatically
disconnect your call if you do not enter a command within 10
seconds.
From another extension within the 964 phone system
1 Page the extension of the answering system you wish to reach (see
“Making a Single-phone Page” in INTERCOM OPERATION).
2 There will be no prompts, you must enter your password within
10 seconds (see “Program Your Password for Remote Operation” in
SET UP SYSTEM FEATURES).
3 Enter the remote commands (see “Remote Commands”).
4 To exit remote operation, hang up. The system will automatically
disconnect your call if you do not enter a command within 10
seconds.
Reviewing an Auto-Attendant Outgoing Message
1 Enter the D-TAD mode at the Auto-Attendant phone.
2 Press o and then 4, 5, or 6 according to the type of Auto-
Attendant message you wish to hear. The system plays the message.
3 Press s to stop playback.
Recording an Auto-Attendant Outgoing Message
1 Enter the D-TAD mode at the Auto-Attendant phone.
2 Press o, then 4, 5, or 6 according to the type of Auto-
Attendant message you wish to record, then press r.
3 After the beep, speak clearly to record your message.
4 Press s to stop recording.
Removing an Auto-Attendant Outgoing Message
1 Enter the D-TAD mode at the Auto-Attendant phone.
2 Press o, then 4, 5, or 6 according to the message type you
wish to delete, and press X.
3 Press X again to confirm your decision.
Using Multiple Auto-Attendants
You may wish to set one or more additional phones to act as Auto-Attendant
for when the primary Auto-Attendant is turned off or busy.
An Auto-Attendant is busy when someone at that extension is:
• programming the phone, or
• accessing messages, or
• on an intercom call, or
• dialing from the Directory or Call History, or
• using any of the lines to make or answer a call, or
• when the D-TAD is recording a message at that extension.
You can choose a particular extension to always be the primary Auto-Attendant
by setting that extension to have the shortest pickup time and setting the
pickup times of other Auto-Attendants in the order you choose. Otherwise,
the primary Auto-Attendant could change as the system automatically assigns
incoming calls among active Auto-Attendants.
NOTE: When multiple Auto-Attendants are used, program the pickup times
with at least three seconds between them to avoid more than one Auto-
Attendant trying to pick up a single call at the same time. To program pickup
times see “Set Auto-Attendant Pickup Delay” in SET UP SYSTEM FEATURES.